Bleed in Printing
What is bleed?
Bleed refers to a background color, graphic, or image that extends to the edge of the finished paper size and beyond. Bleed is especially important if the print design has colours at all the 4 sides. This is to ensure that after printing and during the process of trimming to the required finished size, there will not be any visible unprinted or uncoloured borders at the sides of the printed finished product.
Printing equipment requires a certain tolerance to apply ink up to the cut edge of a sheet of paper. So an extra 3mm margin is typically added on each side of the design, enabling the background color, graphic, or image to extend past (ie. "bleed off") the paper's final trim edge. This extra bleed area will be cut off the printed sheet. For example, an A4 sheet that incorporates bleed in its design will be 216mm (W) x 303mm (W) before being trimmed to a finished size of 210mm (W) x 297mm (H).
In contrast, a piece with no bleed keeps all the printed elements a minimum of 3mm away from the edge of the paper on all four sides. Nothing is printed to the finished edge of the paper.
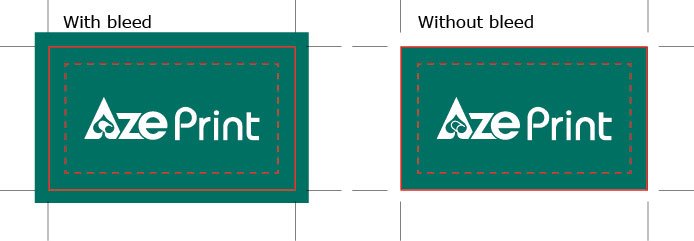 Bleed vs. No Bleed The illustration on the left shows a page printed with bleed, before trimming. When trimmed, the finished piece will have color or graphic content extending to the finished, cut edge on all four sides. The illustration on the right shows a page designed without any bleed. When trimmed, the finished piece will most likely have unprinted border on all four sides. |
A sheet with bleed is larger than its finished size. The "trim edge" refers to each edge of the sheet after it has been cut to its finished size. Any printed elements that extend beyond the trim edge will be cut off in the process of reducing the paper to its finished size.
What is the safety zone?
To avoid being trimmed off, text and other important matter must stay within a "safety zone" that is is a minimum of 3mm away from the trim edge. Any design elements that extend beyond the safety zone risk being cut off in the process of trimming the paper to its finished size. For example, the safety zone for an A4 finished size print of 210mm (W) x 297mm (h) would be 3mm smaller on each side, or 204mm (W) x 291mm (H).
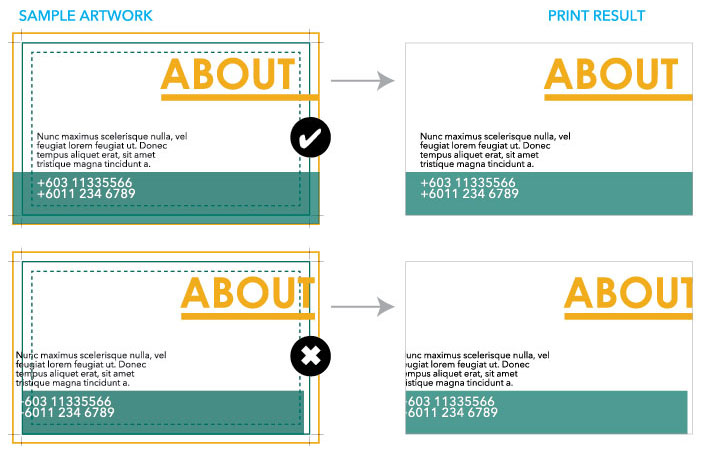 Bleed Before and After Trimming The illustration on the left shows a document designed with bleed (finished size plus an extra 3mm on each side). Because minor variations can occur when cutting the paper to its finished size, to avoid being trimmed off, text and other important matter must stay 3mm away from the trim edge (the "safety zone"). The illustration on the right shows the printed piece after trimming. Note the last "e" in "Example" has been cut in half because it extended past the safety zone and into the trimming area. Some of the artwork has been cut off for the same reason. Any elements that extend past the safety zone risk being lost in the process of trimming the paper to its finished size. |
To create bleed in your design, simply make sure the background color, graphic, or image you want it to bleed extends off the the final trim edge of the finished trimmed size print by 3mm.
If you are creating your file in an application such as Photoshop, you must make your document height and width dimensions 6mm larger than your final trim size. For example, if the finished size is 210mm (W) x 297mm (H) then make your document 216mm (W) x 303mm (H). Position guides that are 3mm from each edge. For design purposes, these guides will represent where the paper (and any of your design elements) will be cut.
Position any background color, graphic, or image that you want to bleed so they extended past your guides, all the way to the outside edge of the document. Remember, the extra 3mm will be cut off after your piece is printed.


